
There is always the possibility that you sell or donate your iPhone to someone. In this case, you will surely want to delete your private information, to prevent anyone from seeing it.
One way to do this is by using the default data eliminator on your iPhone. But, in reality, this is not enough! The data deleted by this means can still be recovered.
Since that is the case, you will need a stronger tool to erase your private information so it cannot be recovered. Fortunately, there are many tools of this style.
Method 1: Simply deleted And Factory Reset
This method is the simplest method. It is very fast to remove content and settings on your IOS devices and this method is adopted for general users. This method is best for those users who don’t want to leave their important data in your iPhone if you don’t know about this method then follow all the steps are given below.
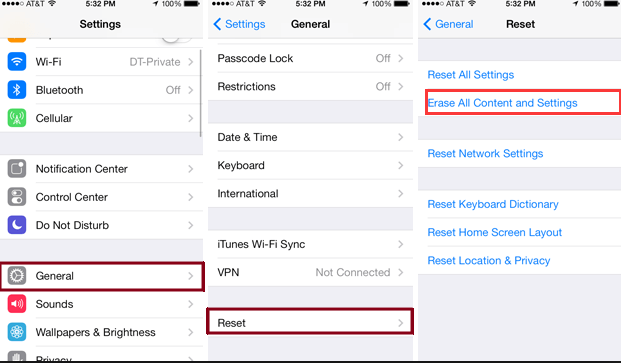
- First unlock your iPhone device and open the settings of your iPhone
- Now scroll down the setting page and select the general option
- After this select the reset that is present at the bottom of the page and click on the “delete all contents and settings” and that’s it
Method 2:Permanently Erase iPhone Photos with SafeWiper For iOS
SafeWiper For iOS is still the best application and is the most recommended for iPhone users due to its amazing and sophisticated features (but still easy to use):
- Erase all data : Any data erased with SafeWiper will disappear permanently. This means that it can never be recovered, nor with the best recovery tools.
- Delete Private Files : No matter how private your data and the way they are, SafeWiper will eliminate them all without possibilities of recovery.
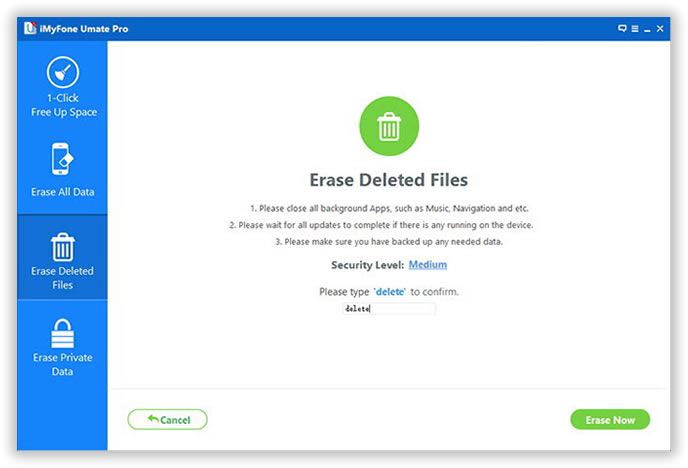
- Erase deleted Files: If you deleted your data using normal methods, then there are chances that they will be recovered and this is bad for your security. However, SafeWiper can search this data and delete it again so it cannot be recovered.
What are the Steps Required to Use SafeWiper For iOS?
One of the advantages of SafeWiper is its ease of use, since it requires only a few steps to complete the activities:
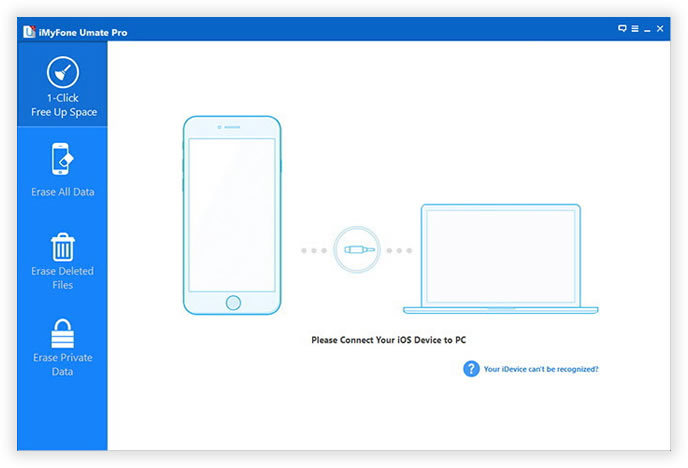
Step 1: Download SafeWiper program on your computer, run and connect your iPhone to your computer.
Step 2: Select the required erase mode.and scan your iPhone.
Step 3: Select the photos that you need to delete ,then click on the “Erase Now” button to permanently erase your iPhone photos.
Method 3:Delete Photos From iPhone Manually
There’s no technology required to manually remove photos from your phone,you just need to open the “Photos” App on your phone’s screen,then select any photos that you want to delete from your iPhone ,then click the “Delete”Burn ,after this the Pictures that were selected were removed from iPhone .This approach is simple, but the only downside is that photos that are removed this way can’t be removed completely,in fact, they will remain in their phones until they are covered by new data.


- Open the “Photos”App on iPhone screen
- Click the select button at the top right of the screen
- After this select the photos that you want to delete
- Click “Delete”button to delete
Conclusion:
These are all the methods that I above mentioned read all the methods carefully and select one method according to your situation but my recommendation is SafeWiper For iOS, because this tool is best but its paid, first you can use its free version to check this tool and after this buy it if its work properly for you.